AWS IAM Roles Anywhere with open-source private CA
A step-by-step guide on implementing AWS IAM Roles Anywhere using our open-source private CA, also published as a blog post.
Introduction
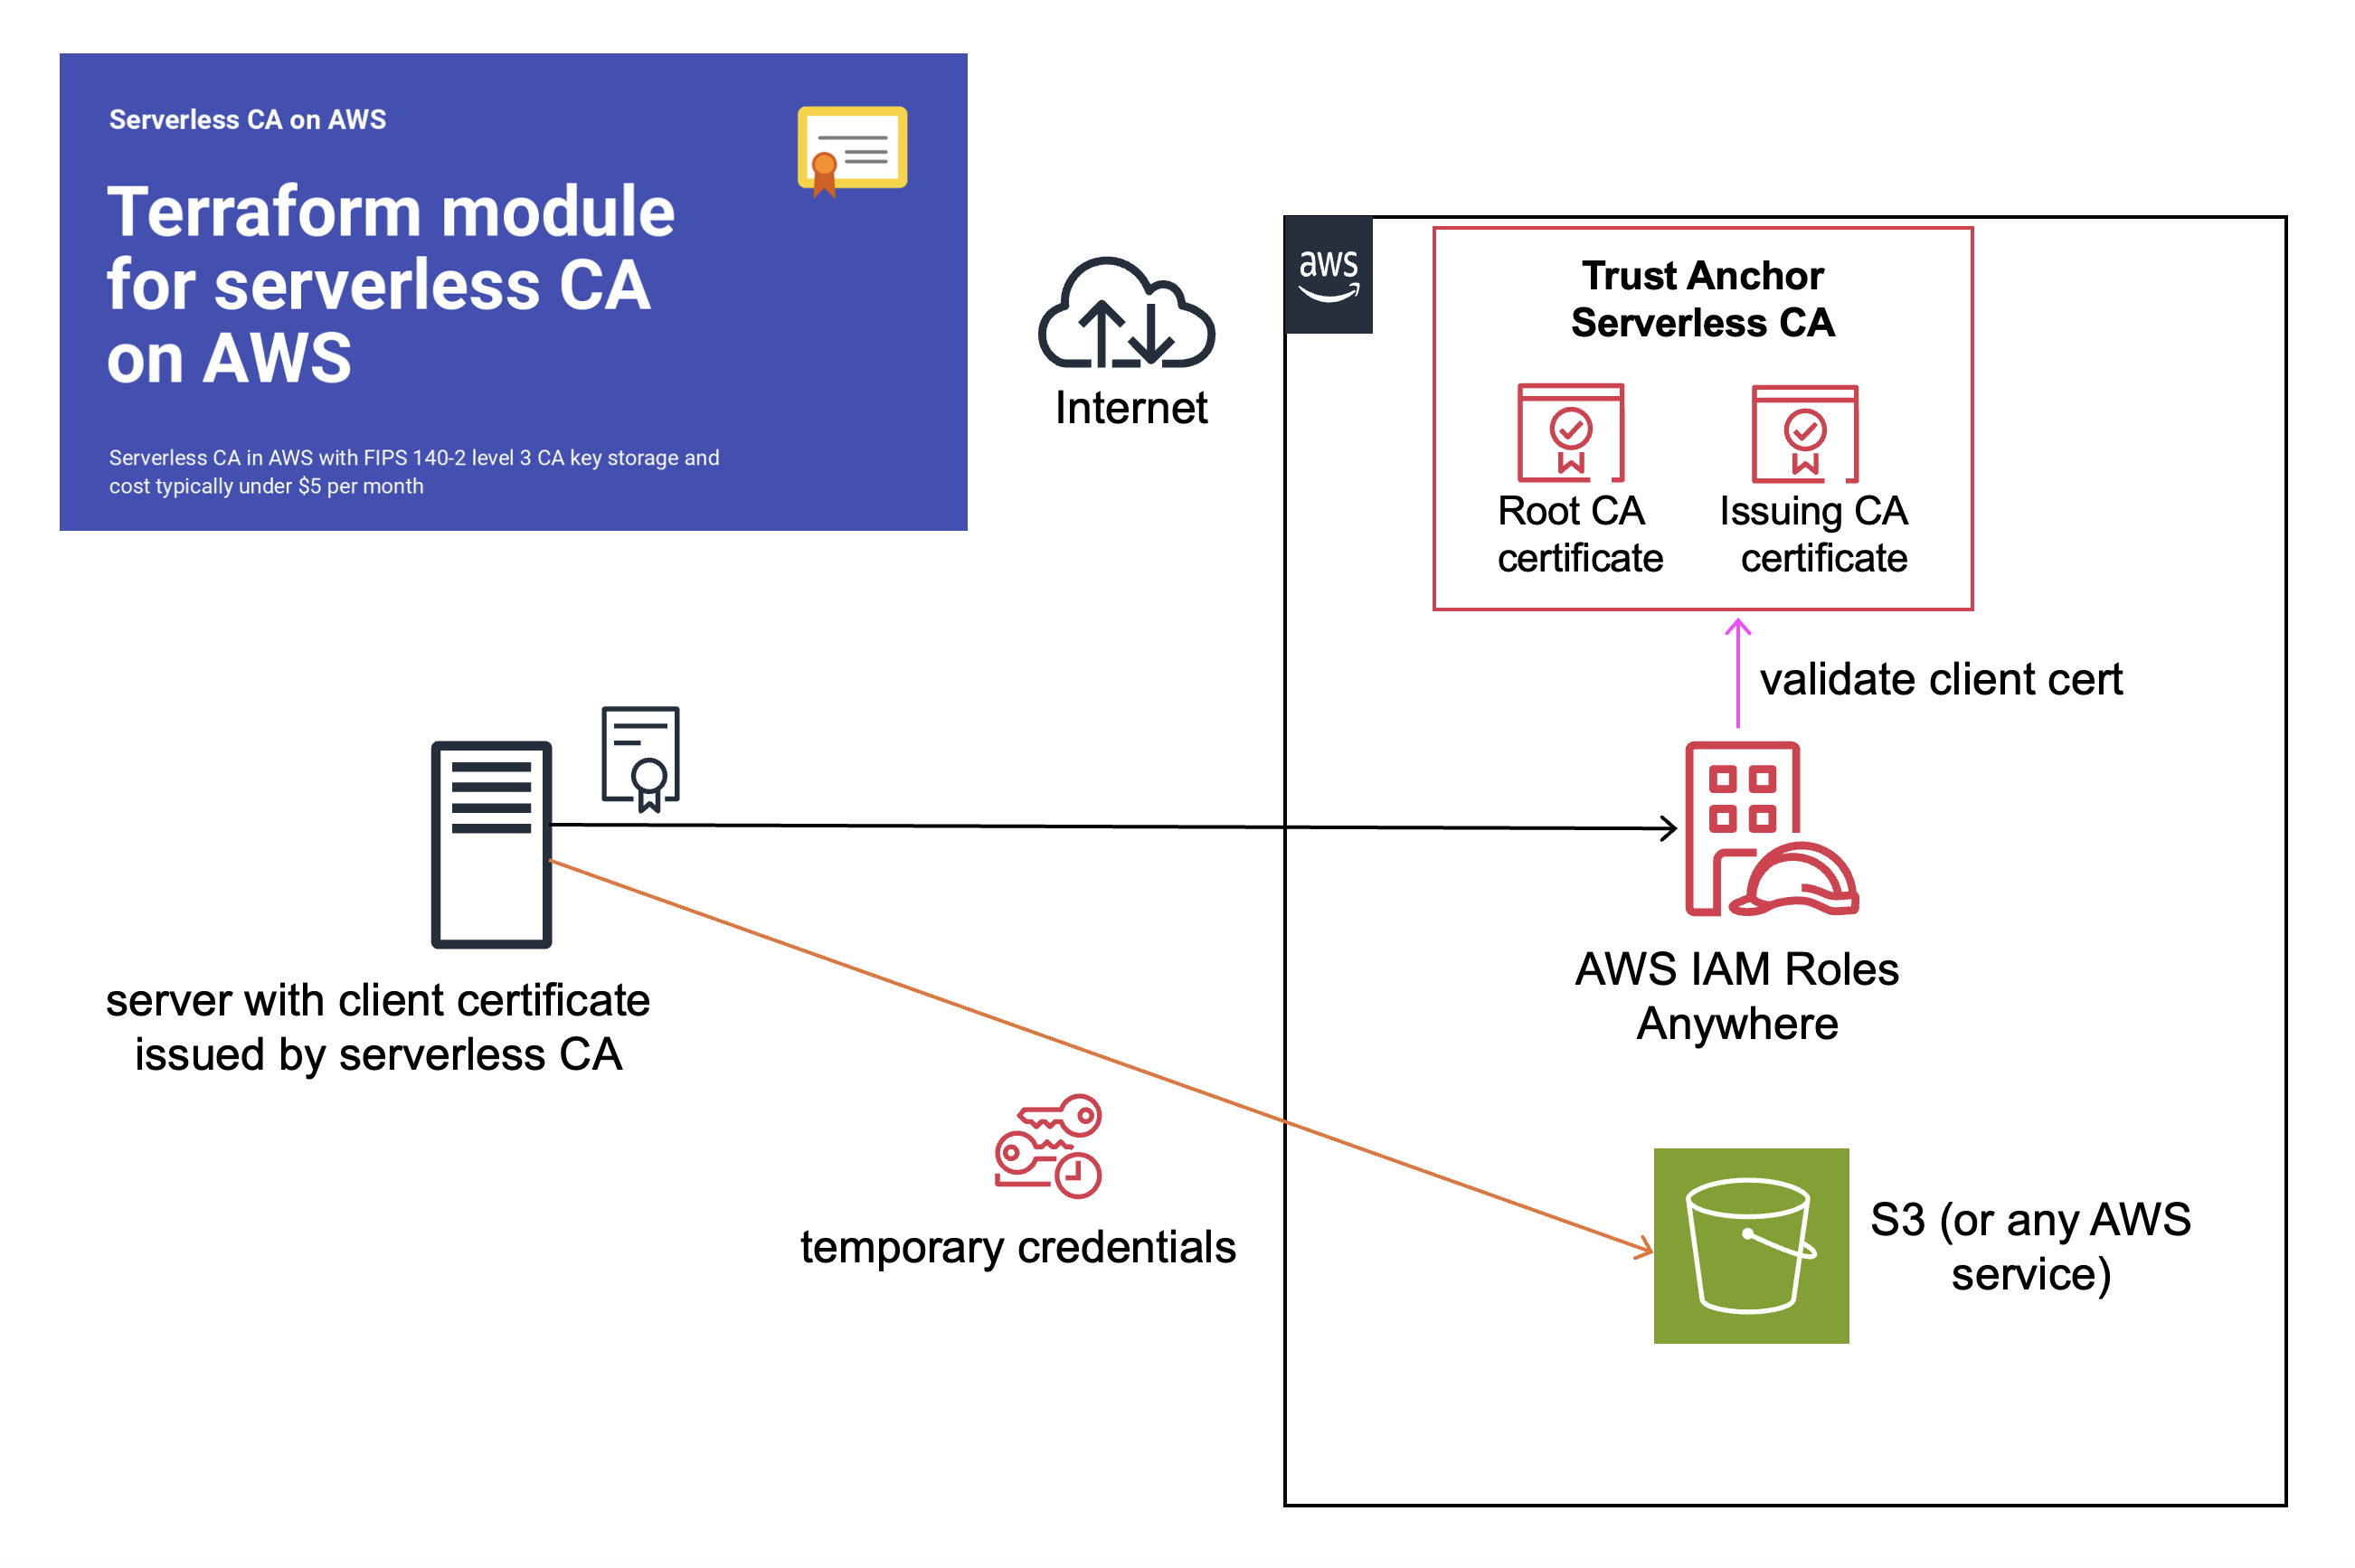
In 2022 AWS released AWS IAM Roles Anywhere introducing certificate authentication as a new way of connecting from on-premise servers to AWS, as an alternative to using secret access keys.
Implement open-source serverless CA
If you haven’t already, set up the open-source serverless CA as detailed in the Getting Started guide. From a security perspective, a production CA should be in a dedicated AWS account, separate from the AWS account in which you’re setting up AWS IAM Roles Anywhere. I’ll refer to the two AWS accounts as the CA and Application AWS accounts respectively.
Download certificate Bundle
- In your CA AWS account, select S3
- Choose the S3 bucket with
externalincluded in the name
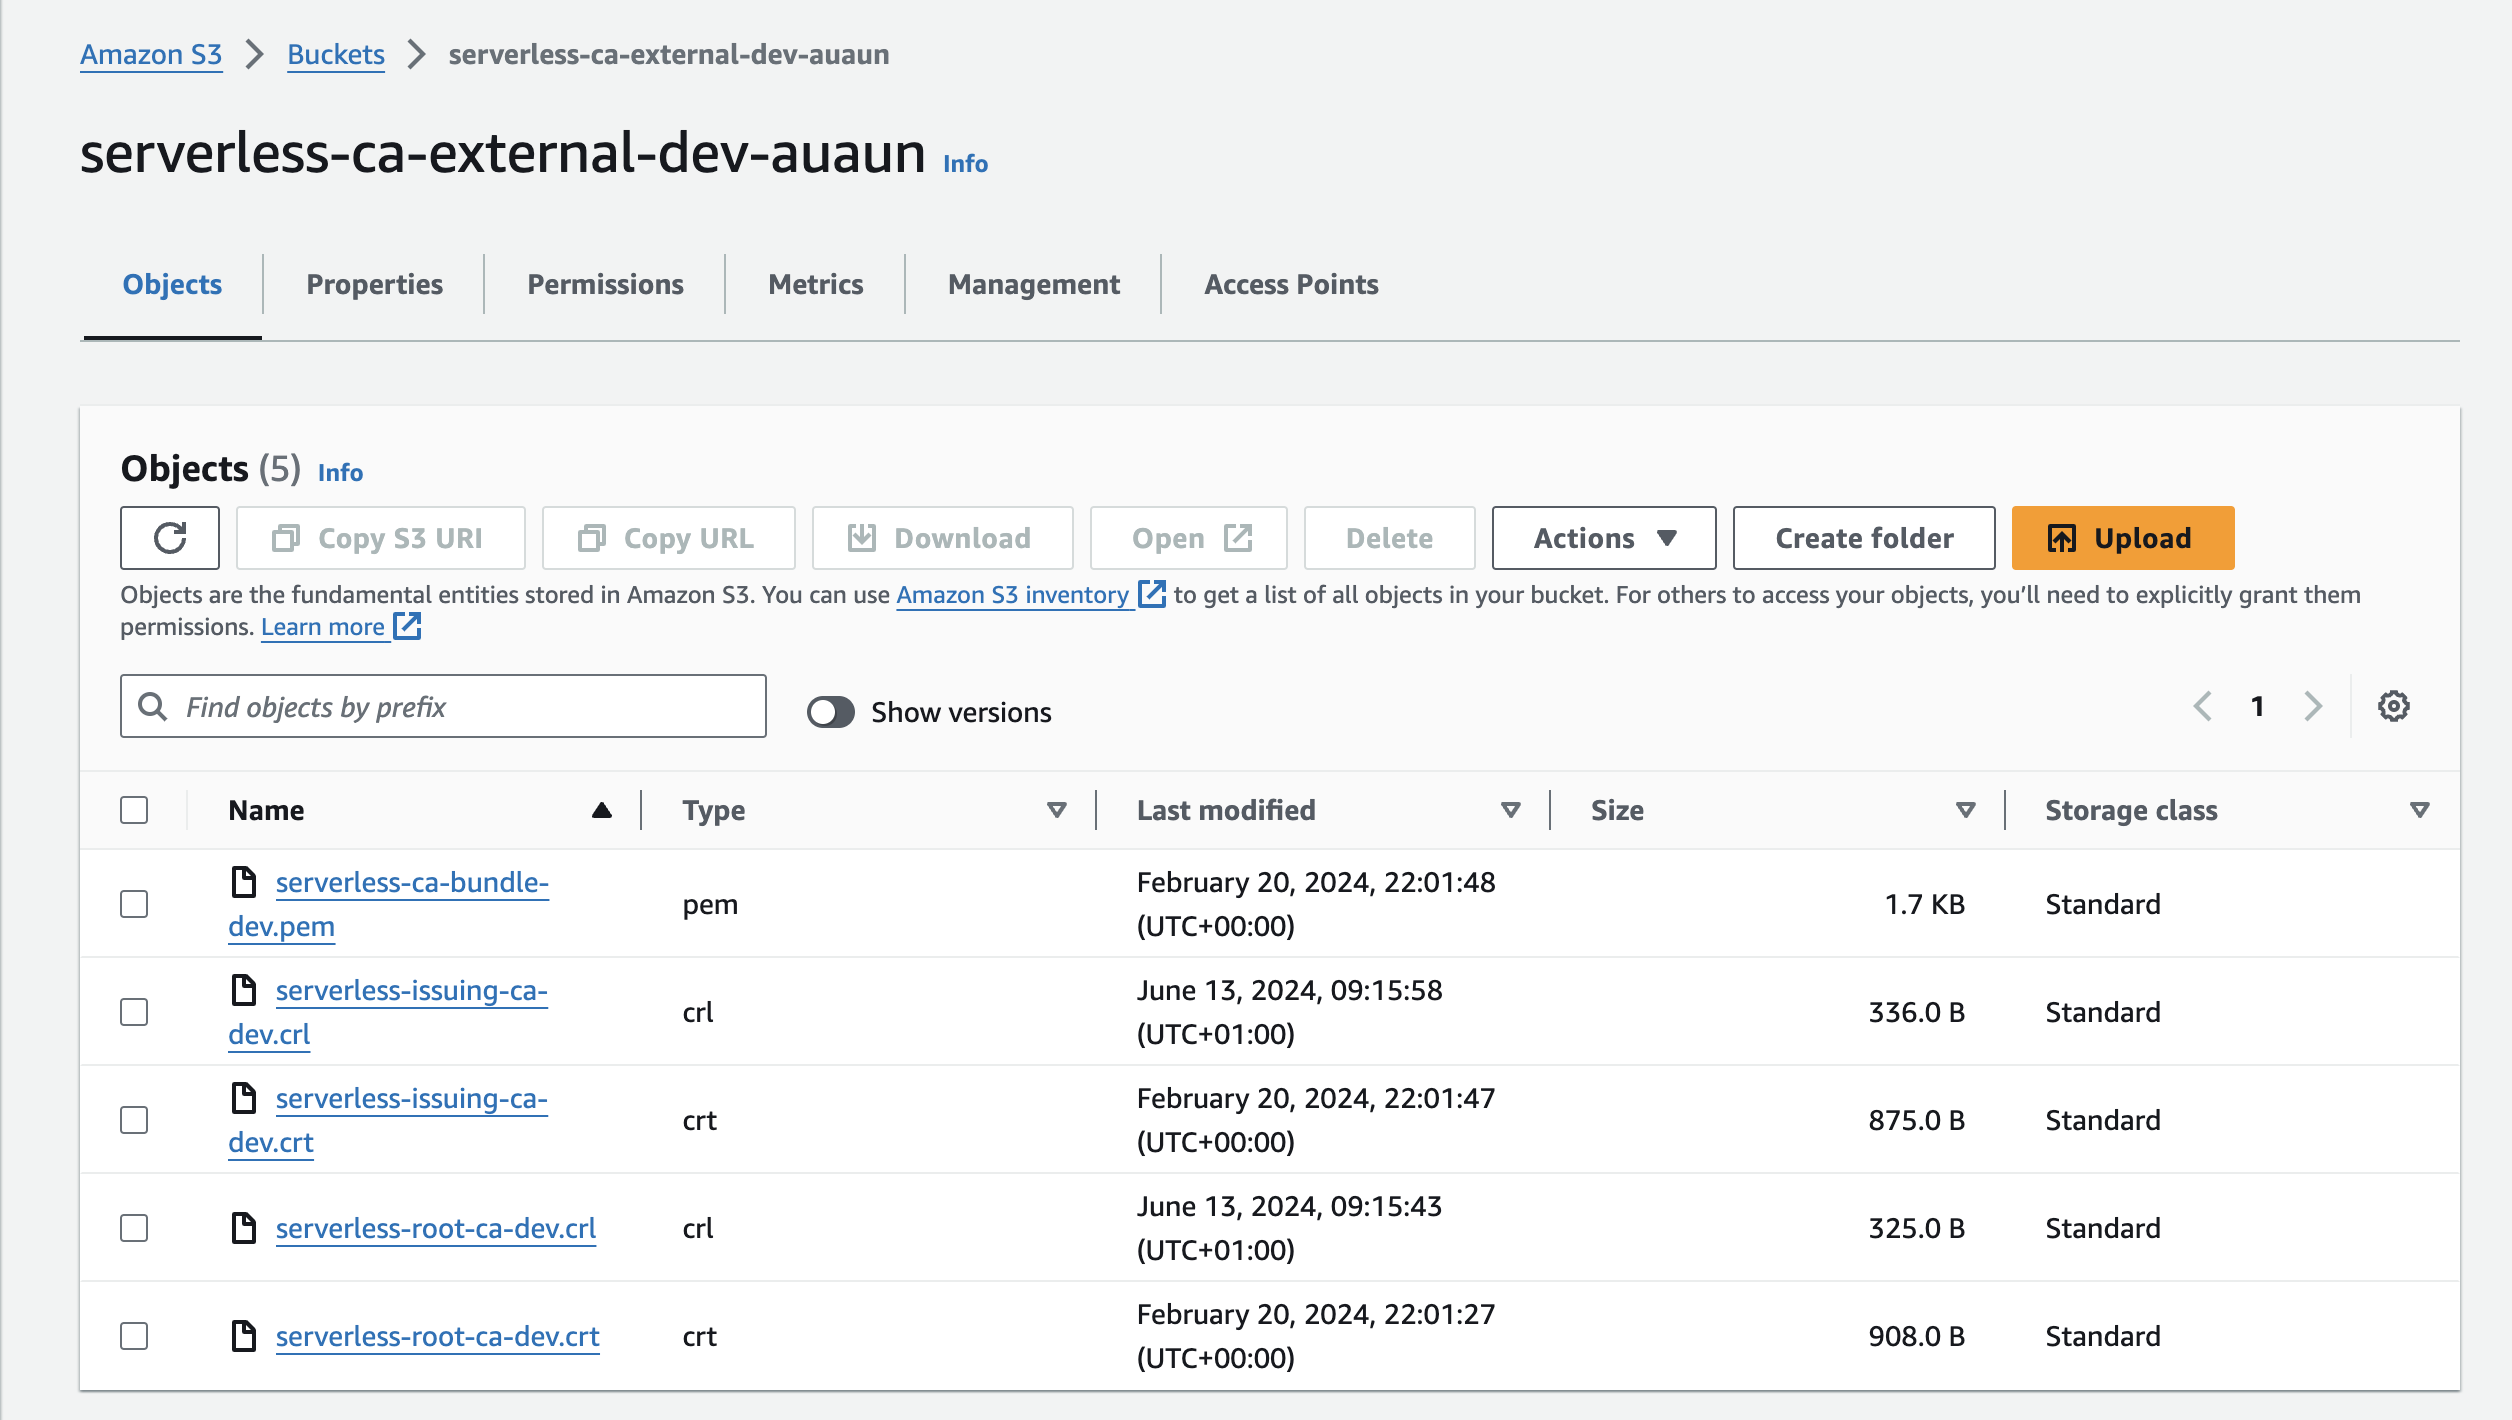
- Download the CA bundle, in the above example
serverless-ca-bundle-dev.pem - The bundle consists of the Root CA and Issuing CA certificates, combined into a single file
- Open with a text editor and copy to your clipboard
Create Trust Anchor
- Log in to your Application AWS account
- Select IAM, Roles
- Scroll down to Roles Anywhere, Manage
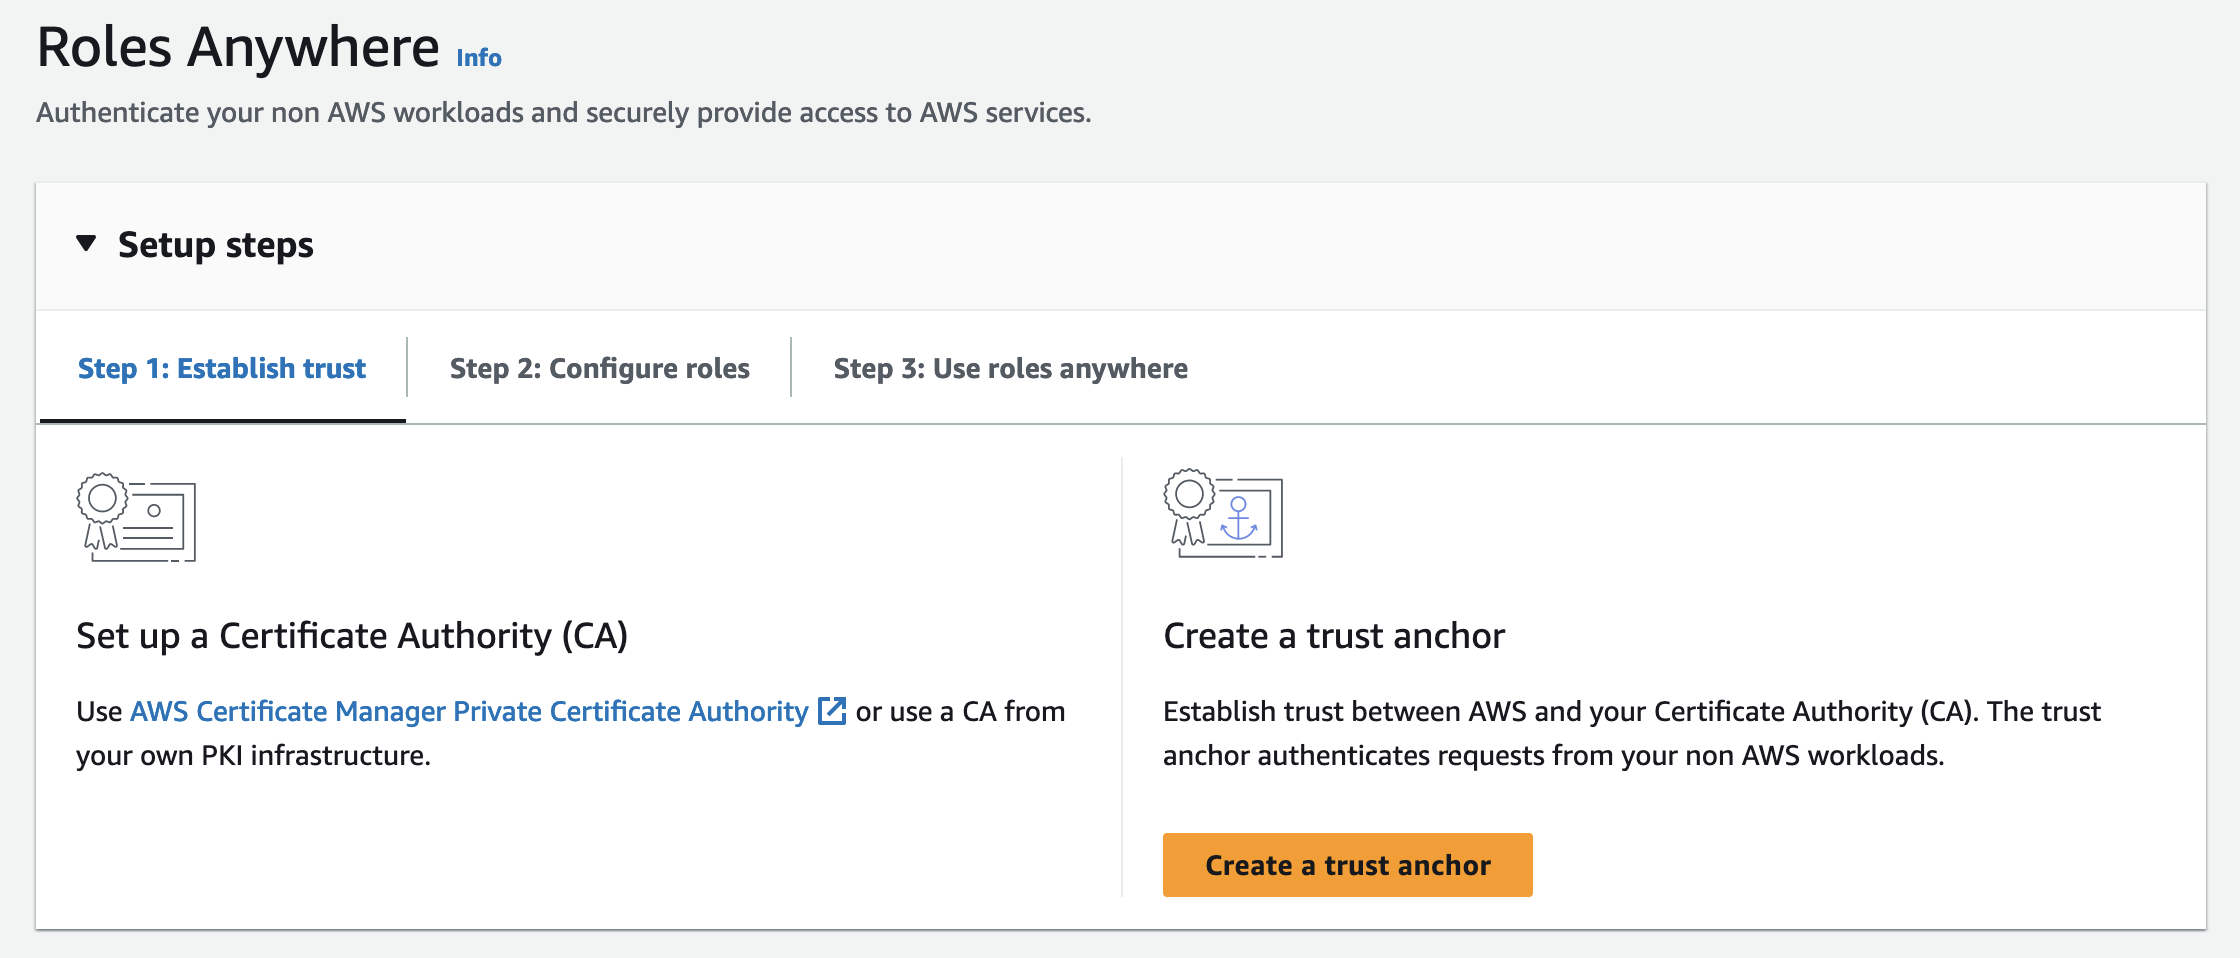
- Create a trust anchor
- Set a name for the trust anchor, e.g. serverless-ca
- Select External certificate bundle
- Paste in the CA certs bundle certs from your clipboard
- Leave notification defaults
- Add tags if desired
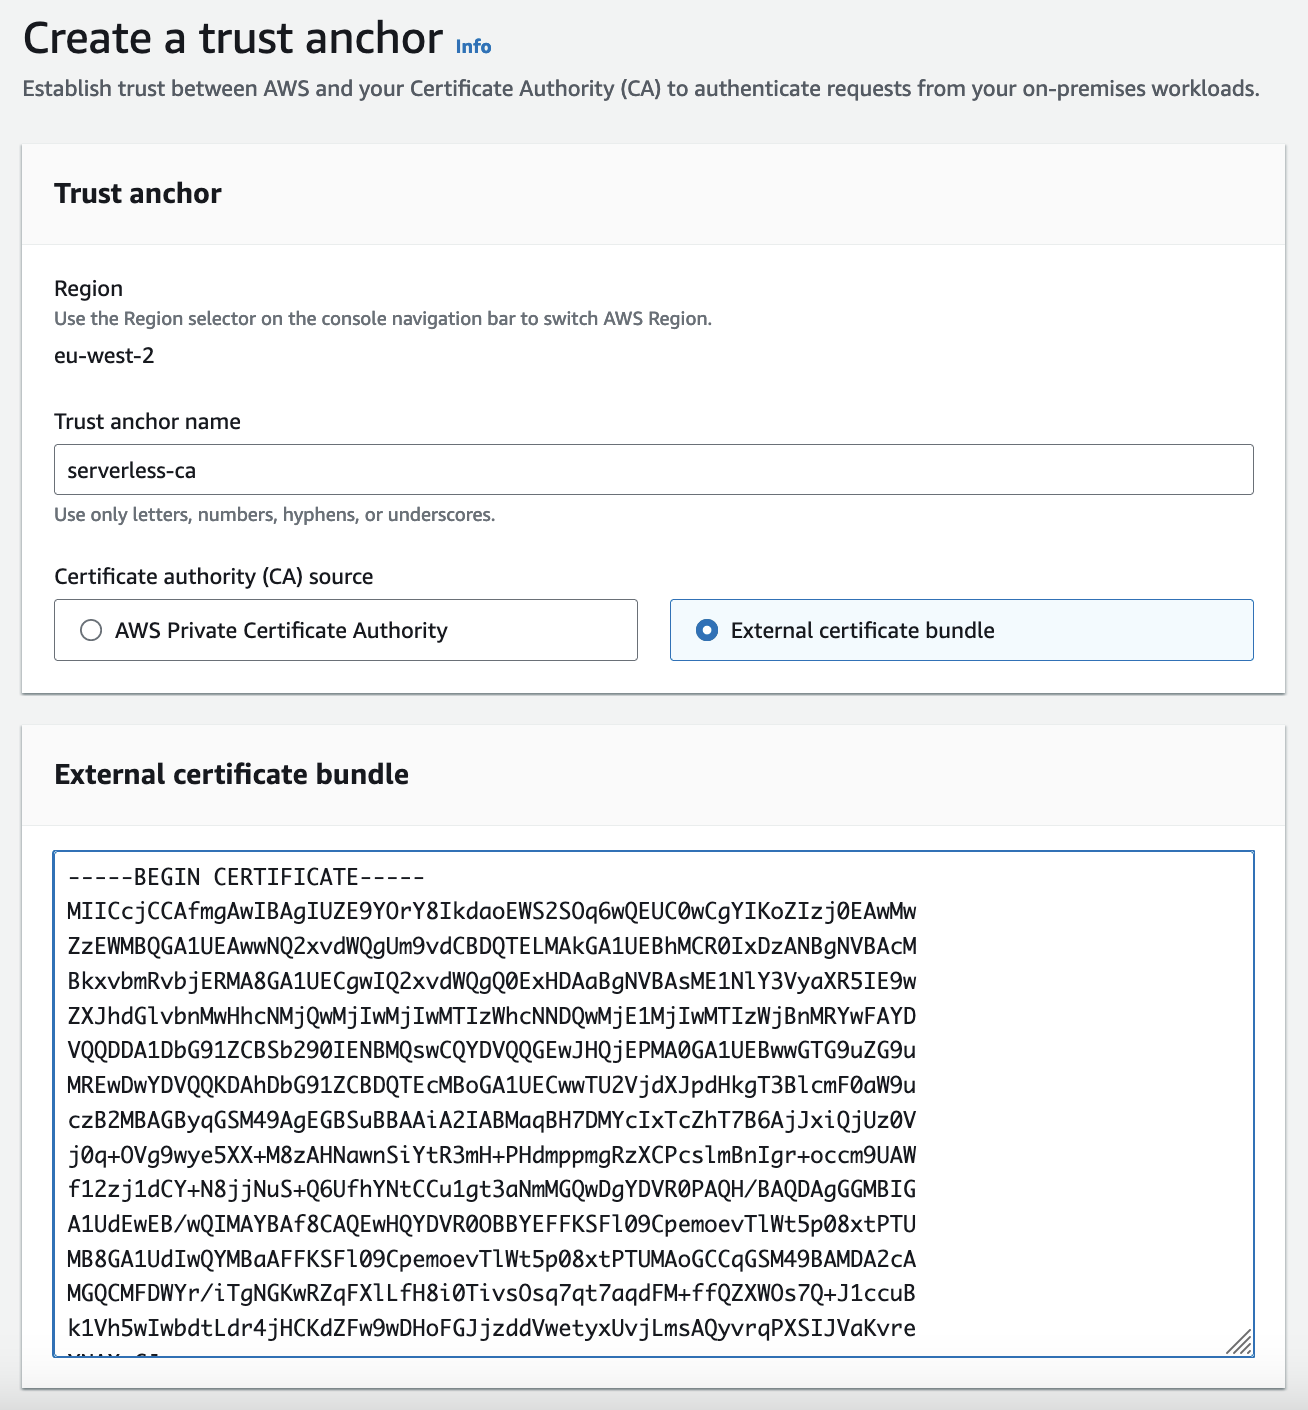
- Press Create a trust anchor
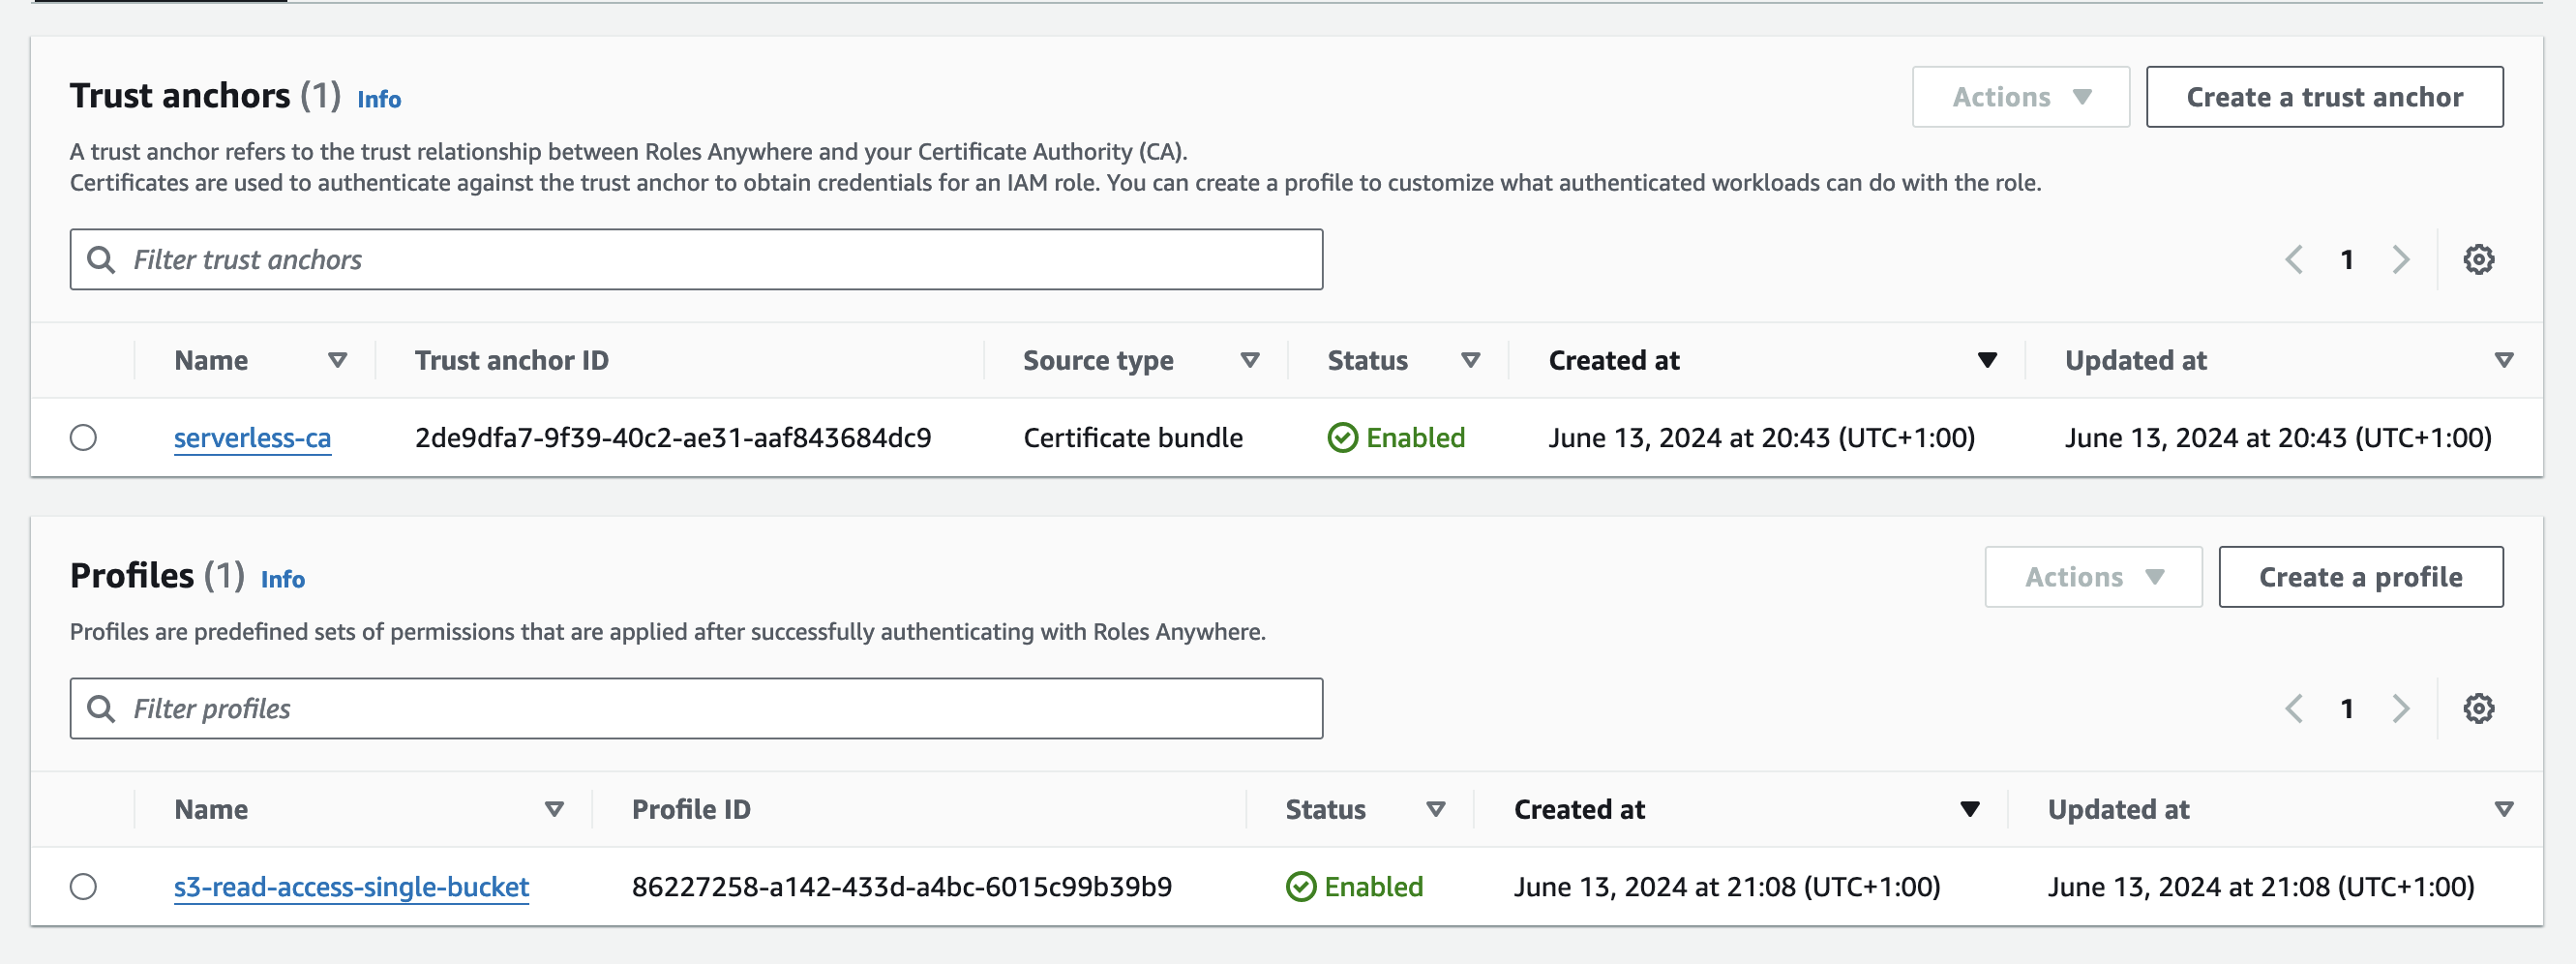
- Your trust anchor should now be created

Create IAM Role
- Select IAM, Roles, Create role
- Select Custom Trust Policy
- Copy and Paste the trust policy below
{
    "Version": "2012-10-17",
    "Statement": [
        {
            "Effect": "Allow",
            "Principal": {
                "Service": "rolesanywhere.amazonaws.com"
            },
            "Action": [
                "sts:AssumeRole",
                "sts:TagSession",
                "sts:SetSourceIdentity"
            ],
            "Condition": {
                "StringEquals": {
                    "aws:PrincipalTag/x509Subject/OU": "Security Operations"
                }
            }
        }
    ]
}
The optional condition statement requires the client certificate to include the Security Operations OU.
- Press Next
- Select the AWS managed policy AmazonS3FullAccess
- This will allow full access to all S3 buckets in your account, we will narrow this down in the next section
- Add a role name
roles-anywhere-s3-full-access
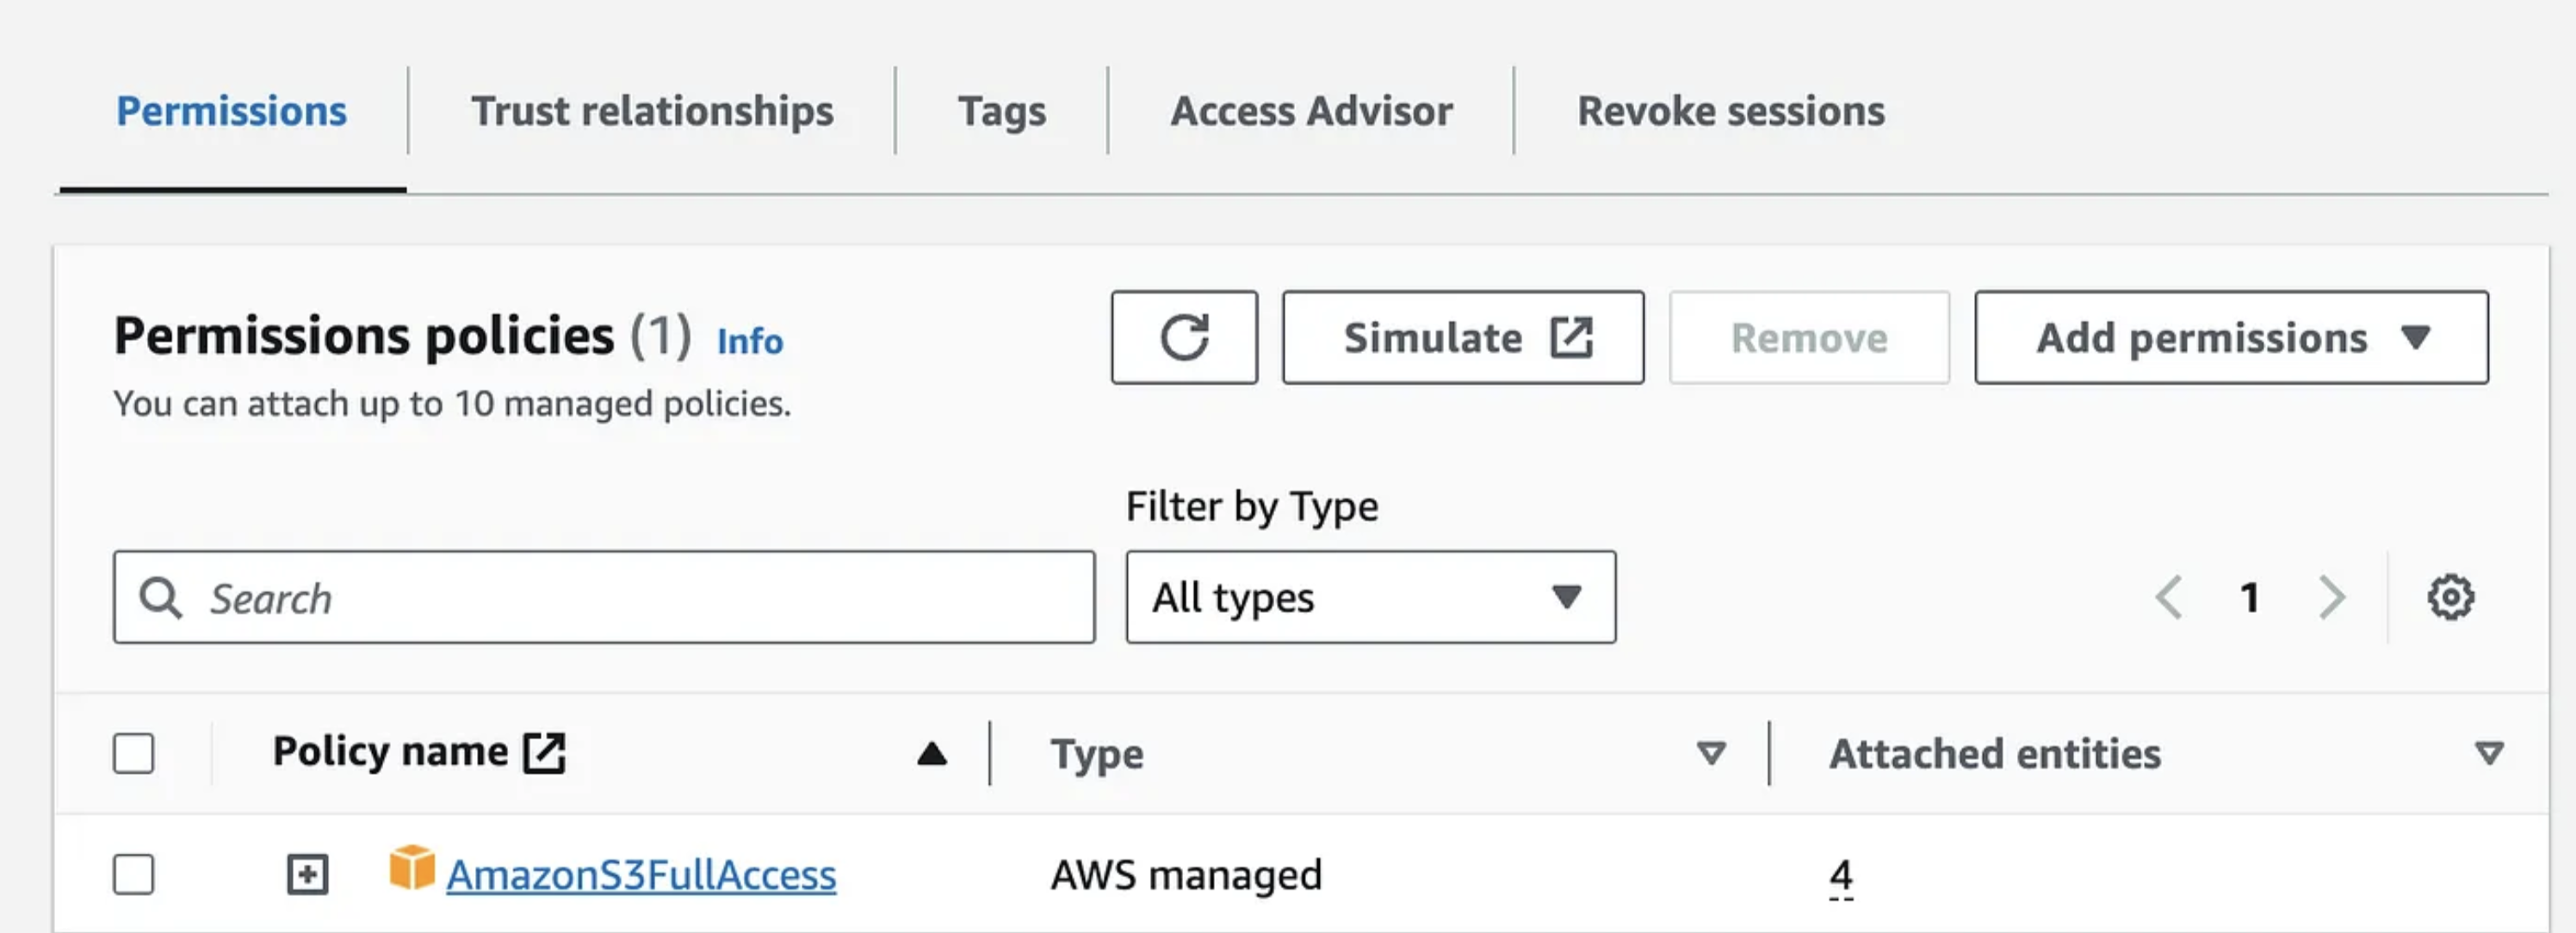
- These permissions will be further restricted by the AWS IAM Roles Anywhere profile.
- Press Create Role
Create Roles Anywhere Profile
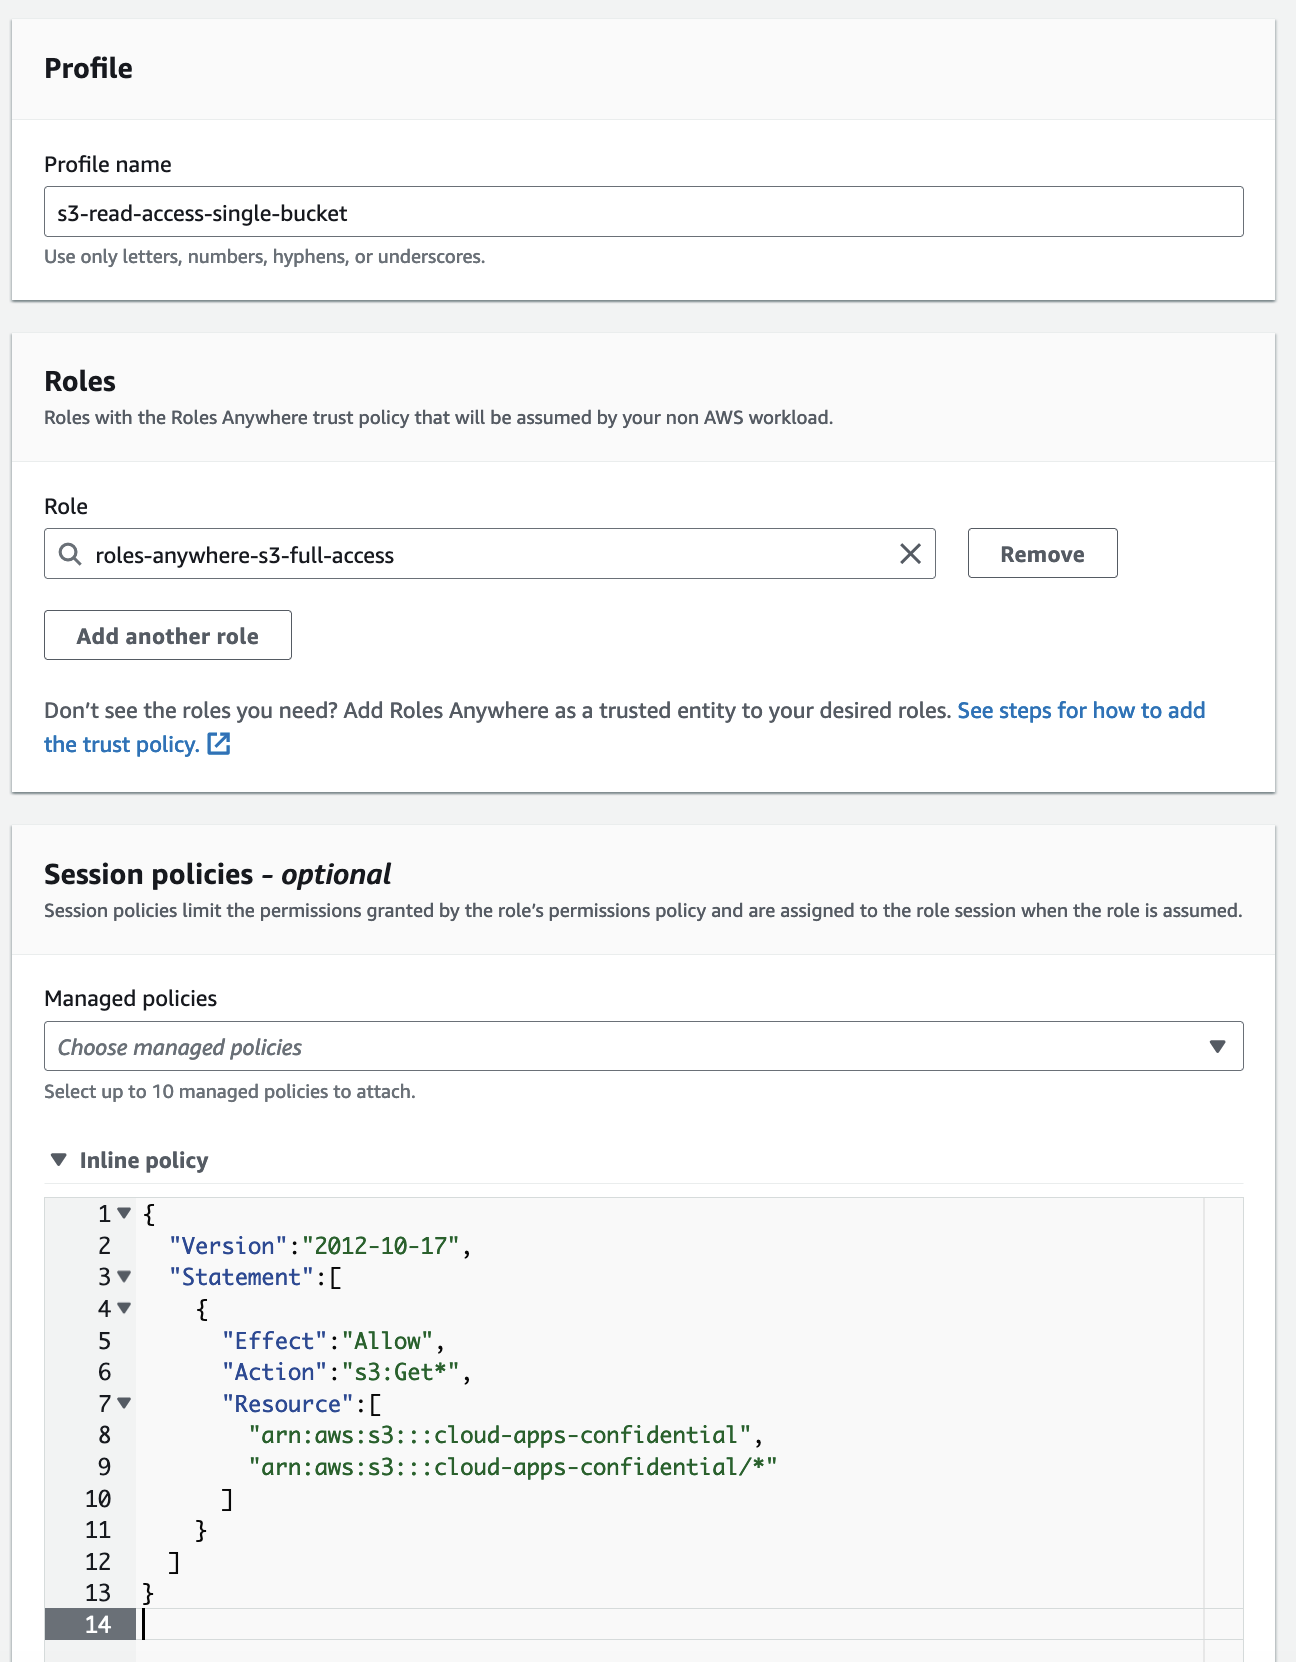
The optional IAM Roles Anywhere profile restricts access to a subset of permissions included in the policy assigned to the IAM role.
- Search for IAM Roles Anywhere
- This will take you to IAM, Roles, Roles Anywhere
- Create a profile
- This is an optional session policy which further limits permissions
- Effective permissions are the intersection of the session and role policies
- Enter a name for the profile, e.g. s3-read-access-single-bucket
- Select the role you created earlier
- Copy and Paste the session policy below
- Replace
<BUCKET_ARN>with one of your S3 buckets
{
  "Version":"2012-10-17",
  "Statement":[
    {
      "Effect":"Allow",
      "Action":"s3:Get*",
      "Resource":[
        "<BUCKET ARN>",
        "<BUCKET ARN>/*"
      ]
    }
  ]
}
- Press Create a Profile
- You will now see both the Trust Anchor and Profile in the Roles Anywhere configuration
Obtain client certificate
- Issue a client certificate to your laptop using the
utils\client-cert.pyscript as described in the serverless CA Getting Started guide - This will create the following files in your home directory:
certs/client-key.pem
certs/ca-bundle.pem
certs/client-cert.crt
certs/ca-cert-key-bundle.pem
Test client certificate and key
Download AWS IAM Roles Anywhere Credential Helper
- Download the AWS IAM Roles Anywhere Credential Helper tool for your operating system
- Copy the binary into your home directory
- Alternatively copy to another location, e.g.
usr/bin/localand set directory in yourPATH - if using MacOS, remove file name extended attribute:
xattr -c aws_signing_helper - set as executable:
chmod 755 aws_signing_helper
Initial Test
./aws_signing_helper credential-process \
    --certificate certs/ca-bundle.pem \
    --private-key certs/client-key.pem \
    --trust-anchor-arn "arn:aws:rolesanywhere:eu-west-2:992382525818:trust-anchor/2de9dfa7-9f39-40c2-ae31-aaf843684dc9" \
    --profile-arn "arn:aws:rolesanywhere:eu-west-2:992382525818:profile/86227258-a142-433d-a4bc-6015c99b39b9" \
    --role-arn "arn:aws:iam::992382525818:role/roles-anywhere-s3-full-access"
- customise the above with your own ARNs
- from your home directory, copy and paste to your terminal and press Enter
- you should receive a response like this:
{
  "Version":1,
  "AccessKeyId":"XXXXXXXXXXXX",
  "SecretAccessKey":"XXXXXXXXXXXX",
  "SessionToken":"XXXXXXXXXXXX",
  "Expiration":"2024-06-13T21:35:23Z"
}
Set AWS CLI profile
While we could extract these values and set as environment variables, a more convenient approach is to permanently configure a new AWS CLI profile.
Using a text editor such as vi edit ~/.aws/config and insert:
[profile secops]
    credential_process = ./aws_signing_helper credential-process --certificate certs/ca-bundle.pem --private-key certs/client-key.pem --trust-anchor-arn arn:aws:rolesanywhere:REGION:ACCOUNT_ID:trust-anchor/TRUST_ANCHOR_ID --profile-arn arn:aws:rolesanywhere:REGION:ACCOUNT_ID:profile/PROFILE_ID --role-arn arn:aws:iam::ACCOUNT_ID:role/ROLE_NAME
- for example:
[profile secops]
    credential_process = ./aws_signing_helper credential-process --certificate certs/ca-bundle.pem --private-key certs/client-key.pem --trust-anchor-arn "arn:aws:rolesanywhere:eu-west-2:992382525818:trust-anchor/2de9dfa7-9f39-40c2-ae31-aaf843684dc9" --profile-arn "arn:aws:rolesanywhere:eu-west-2:992382525818:profile/86227258-a142-433d-a4bc-6015c99b39b9" --role-arn "arn:aws:iam::992382525818:role/roles-anywhere-s3-full-access"
- substitute your ARNs
- save changes
Test access
- check AWS identity:
aws sts get-caller-identity --profile secops
- you should get a response like this:
{
    "UserId": "AXXX6ODU3UF5DTDLJCYVE:61d5692c1982239b82255b38e6ced2aa34712ff0",
    "Account": "992382525818",
    "Arn": "arn:aws:sts::992382525818:assumed-role/roles-anywhere-s3-full-access/61d5692c1982239b82255b38e6ced2aa34712ff0"
}
- list all S3 buckets, this should fail as access is only allowed to a single bucket
aws s3 ls --profile secops
An error occurred (AccessDenied) when calling the ListBuckets operation: Access Denied
- download a file from the designated S3 bucket, this should succeed
- replace the example below with your own S3 bucket and object
aws s3 cp s3://cloud-apps-confidential/confidential.png confidential.png --profile secops
download: s3://cloud-apps-confidential/confidential.png to ./confidential.png
Optionally you can set this AWS CLI profile as your default, in which case you don’t need to include the profile argument.
View connection details
- At IAM, Roles, Roles Anywhere, navigate to your region
- Select Subject Activity

- A record of connections can be seen
- Click on the link to view the certificate used to authenticate
👏 🎉 🎊 Congratulations, you’ve set up and tested AWS IAM Roles Anywhere with the open-source private CA 🎆 🌟 🎇
Security Considerations
AWS IAM Roles Anywhere is a useful additional option for granting on-premise and mobile laptops access to AWS. Effectively it replaces AWS access keys with X.509 certificates.
However it’s important to note that this isn’t necessarily any more secure — a stolen certificate and private key can be used to access AWS just as easily as a stolen access key and secret access key.
Whether this is a secure solution depends very much on how the private key of the client certificate is stored. A good approach is to use hardware devices such as Trusted Platform Modules (TPMs) and Yubikeys, both of which are now supported by the IAM Roles Anywhere credentials helper.
It’s also essential that the Certificate Authority is implemented in a secure manner, as described in Security.